基于WIN10的64位系统演示
一、写在前面
上两期我们基于TensorFlow和Pytorch环境做了图像识别的多分类任务建模。这一期我们做误判病例分析,分两节介绍,分别基于TensorFlow和Pytorch环境的建模和分析。
本期以健康组、肺结核组、COVID-19组、细菌性(病毒性)肺炎组为数据集,基于TensorFlow环境,构建mobilenet_v2多分类模型,因为它建模速度快。
同样,基于GPT-4辅助编程,这次改写过程会简单展示。
二、误判病例分析实战
使用胸片的数据集:肺结核病人和健康人的胸片的识别。其中,健康人900张,肺结核病人700张,COVID-19病人549张、细菌性(病毒性)肺炎组900张,分别存入单独的文件夹中。
直接分享代码:
######################################导入包###################################
from tensorflow import keras
import tensorflow as tf
from tensorflow.python.keras.layers import Dense, Flatten, Conv2D, MaxPool2D, Dropout, Activation, Reshape, Softmax, GlobalAveragePooling2D, BatchNormalization
from tensorflow.python.keras.layers.convolutional import Convolution2D, MaxPooling2D
from tensorflow.python.keras import Sequential
from tensorflow.python.keras import Model
from tensorflow.python.keras.optimizers import adam_v2
import numpy as np
import matplotlib.pyplot as plt
from tensorflow.python.keras.preprocessing.image import ImageDataGenerator, image_dataset_from_directory
from tensorflow.python.keras.layers.preprocessing.image_preprocessing import RandomFlip, RandomRotation, RandomContrast, RandomZoom, RandomTranslation
import os,PIL,pathlib
import warnings
#设置GPU
gpus = tf.config.list_physical_devices("GPU")
warnings.filterwarnings("ignore") #忽略警告信息
plt.rcParams['font.sans-serif'] = ['SimHei'] # 用来正常显示中文标签
plt.rcParams['axes.unicode_minus'] = False # 用来正常显示负号
################################导入数据集#####################################
data_dir = "./MTB-1"
data_dir = pathlib.Path(data_dir)
image_count = len(list(data_dir.glob('*/*')))
print("图片总数为:", image_count)
batch_size = 32
img_height = 100
img_width = 100
# 创建一个数据集,其中包含所有图像的路径。
list_ds = tf.data.Dataset.list_files(str(data_dir/'*/*'), shuffle=True)
# 切分为训练集和验证集
val_size = int(image_count * 0.2)
train_ds = list_ds.skip(val_size)
val_ds = list_ds.take(val_size)
class_names = np.array(sorted([item.name for item in data_dir.glob('*') if item.name != "LICENSE.txt"]))
print(class_names)
def get_label(file_path):
parts = tf.strings.split(file_path, os.path.sep)
one_hot = parts[-2] == class_names
return tf.argmax(one_hot)
def decode_img(img):
img = tf.image.decode_image(img, channels=3, expand_animations=False) # 指定 channels 参数
img = tf.image.resize(img, [img_height, img_width])
img = img / 255.0 # normalize to [0,1] range
return img
# 在创建数据集时,添加一个新的元素:数据集类型
def process_path_with_filename_and_dataset_type(file_path, dataset_type):
label = get_label(file_path)
img = tf.io.read_file(file_path)
img = decode_img(img)
return img, label, file_path, dataset_type
AUTOTUNE = tf.data.AUTOTUNE
# 在此处对train_ds和val_ds进行图像处理,包括添加文件名信息和数据集类型信息
train_ds_with_filenames_and_type = train_ds.map(lambda x: process_path_with_filename_and_dataset_type(x, 'Train'), num_parallel_calls=AUTOTUNE)
val_ds_with_filenames_and_type = val_ds.map(lambda x: process_path_with_filename_and_dataset_type(x, 'Val'), num_parallel_calls=AUTOTUNE)
# 合并训练集和验证集
all_ds_with_filenames_and_type = train_ds_with_filenames_and_type.concatenate(val_ds_with_filenames_and_type)
# 对训练数据集进行批处理和预加载
train_ds_with_filenames_and_type = train_ds_with_filenames_and_type.batch(batch_size)
train_ds_with_filenames_and_type = train_ds_with_filenames_and_type.prefetch(buffer_size=AUTOTUNE)
# 对验证数据集进行批处理和预加载
val_ds_with_filenames_and_type = val_ds_with_filenames_and_type.batch(batch_size)
val_ds_with_filenames_and_type = val_ds_with_filenames_and_type.prefetch(buffer_size=AUTOTUNE)
# 在进行模型训练时,不需要文件名和数据集类型信息,所以在此处移除
train_ds = train_ds_with_filenames_and_type.map(lambda x, y, z, t: (x, y))
val_ds = val_ds_with_filenames_and_type.map(lambda x, y, z, t: (x, y))
for image, label, path, dataset_type in train_ds_with_filenames_and_type.take(1):
print("Image shape: ", image.numpy().shape)
print("Label: ", label.numpy())
print("Path: ", path.numpy())
print("Dataset type: ", dataset_type.numpy())
train_ds = train_ds.prefetch(buffer_size=AUTOTUNE)
val_ds = val_ds.prefetch(buffer_size=AUTOTUNE)
plt.figure(figsize=(10, 8)) # 图形的宽为10高为5
plt.suptitle("数据展示")
for images, labels, paths, dataset_types in train_ds_with_filenames_and_type.take(1):
for i in range(15):
plt.subplot(4, 5, i + 1)
plt.xticks([])
plt.yticks([])
plt.grid(False)
plt.imshow(images[i].numpy())
plt.xlabel(class_names[labels[i]])
plt.show()
######################################数据增强函数################################
data_augmentation = Sequential([
RandomFlip("horizontal_and_vertical"),
RandomRotation(0.2),
RandomContrast(1.0),
RandomZoom(0.5, 0.2),
RandomTranslation(0.3, 0.5),
])
def prepare(ds, augment=False):
ds = ds.map(lambda x, y, z, t: (data_augmentation(x, training=True), y, z, t) if augment else (x, y, z, t),
num_parallel_calls=AUTOTUNE)
return ds
# 注意这里变量名的更改
train_ds_with_filenames_and_type = prepare(train_ds_with_filenames_and_type, augment=True)
# 在进行模型训练时,不需要文件名和数据集类型信息,所以在此处移除
train_ds = train_ds_with_filenames_and_type.map(lambda x, y, z, t: (x, y))
val_ds = val_ds_with_filenames_and_type.map(lambda x, y, z, t: (x, y))
train_ds = train_ds.prefetch(buffer_size=AUTOTUNE)
val_ds = val_ds.prefetch(buffer_size=AUTOTUNE)
###############################导入mobilenet_v2################################
#获取预训练模型对输入的预处理方法
from tensorflow.python.keras.applications import mobilenet_v2
from tensorflow.python.keras import Input, regularizers
IMG_SIZE = (img_height, img_width, 3)
base_model = mobilenet_v2.MobileNetV2(input_shape=IMG_SIZE,
include_top=False, #是否包含顶层的全连接层
weights='imagenet')
inputs = Input(shape=IMG_SIZE)
#模型
x = base_model(inputs, training=False) #参数不变化
#全局池化
x = GlobalAveragePooling2D()(x)
#BatchNormalization
x = BatchNormalization()(x)
#Dropout
x = Dropout(0.8)(x)
#Dense
x = Dense(128, kernel_regularizer=regularizers.l2(0.1))(x) # 全连接层减少到128,添加 L2 正则化
#BatchNormalization
x = BatchNormalization()(x)
#激活函数
x = Activation('relu')(x)
#输出层
outputs = Dense(4, kernel_regularizer=regularizers.l2(0.1))(x) # 添加 L2 正则化,改变输出层的神经元数量为4
#BatchNormalization
outputs = BatchNormalization()(outputs)
#激活函数
outputs = Activation('softmax')(outputs) # 使用softmax激活函数,因为是多分类问题
#整体封装
model = Model(inputs, outputs)
#打印模型结构
print(model.summary())
#############################编译模型#########################################
#定义优化器
from tensorflow.python.keras.optimizers import adam_v2, rmsprop_v2
optimizer = adam_v2.Adam()
#编译模型
model.compile(optimizer=optimizer,
loss='sparse_categorical_crossentropy', # 因为是多分类问题,所以损失函数选择sparse_categorical_crossentropy
metrics=['accuracy'])
#训练模型
from tensorflow.python.keras.callbacks import ModelCheckpoint, Callback, EarlyStopping, ReduceLROnPlateau, LearningRateScheduler
NO_EPOCHS = 50
PATIENCE = 10
VERBOSE = 1
# 设置动态学习率
annealer = LearningRateScheduler(lambda x: 1e-5 * 0.99 ** (x+NO_EPOCHS))
# 设置早停
earlystopper = EarlyStopping(monitor='loss', patience=PATIENCE, verbose=VERBOSE)
#
checkpointer = ModelCheckpoint('mtb_jet_best_model_mobilenetv3samll-1.h5',
monitor='val_accuracy',
verbose=VERBOSE,
save_best_only=True,
save_weights_only=True)
train_model = model.fit(train_ds,
epochs=NO_EPOCHS,
verbose=1,
validation_data=val_ds,
callbacks=[earlystopper, checkpointer, annealer])
#保存模型
#model.save('mtb_jet_best_model_mobilenet-1.h5')
#print("The trained model has been saved.")
###########################误判病例分析#################################
import pandas as pd
# 提取图片的信息并预测
data_list = []
for image, label, path, dataset_type in all_ds_with_filenames_and_type:
# 获取图片名称、类别信息
path_parts = path.numpy().decode('utf-8').split('/')
dataset_type = dataset_type.numpy().decode('utf-8')
true_class = class_names[label.numpy()]
image_name = path_parts[-1]
# 使用模型预测图片的类别
img_array = np.expand_dims(image, axis=0)
predictions = model.predict(img_array)
pred_class = class_names[np.argmax(predictions)]
# 根据预测结果判断所属的组别
if true_class == pred_class:
group = 'A'
elif true_class == 'COVID-19':
if pred_class == 'Normal':
group = 'B'
elif pred_class == 'Pneumonia':
group = 'C'
elif pred_class == 'Tuberculosis':
group = 'D'
elif true_class == 'Normal':
if pred_class == 'COVID-19':
group = 'E'
elif pred_class == 'Pneumonia':
group = 'F'
elif pred_class == 'Tuberculosis':
group = 'G'
elif true_class == 'Pneumonia':
if pred_class == 'COVID-19':
group = 'H'
elif pred_class == 'Normal':
group = 'I'
elif pred_class == 'Tuberculosis':
group = 'J'
elif true_class == 'Tuberculosis':
if pred_class == 'COVID-19':
group = 'H'
elif pred_class == 'Normal':
group = 'I'
elif pred_class == 'Pneumonia':
group = 'J'
# 保存图片的信息和预测结果
data_list.append([image_name, dataset_type, pred_class, group])
# 将结果转化为DataFrame并保存为csv文件
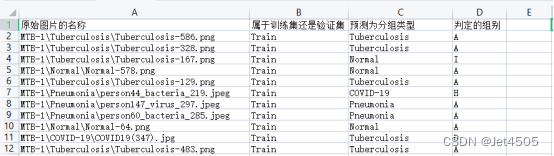
result = pd.DataFrame(data_list, columns=["原始图片的名称", "属于训练集还是验证集", "预测为分组类型", "判定的组别"])
result.to_csv("result-m-t.csv", index=False)三、改写过程
先说策略:首先,先把二分类的误判病例分析代码改成四分类的;其次,用咒语让GPT-4帮我们续写代码已达到误判病例分析。
策略的理由:之前介绍过,做误判病例分析是需要读取图片的路径信息。悲剧的是,我们之前在读取数据的时候使用的是“image_dataset_from_directory”函数,它不提供路径信息。因此,在二分类的误判病例分析的教程中,我们修改了数据读取的代码,因此,在此基础上进行修改,效率最高!
提供咒语如下:
①改写{代码1},改变成4分类的建模。代码1为:{XXX};
②在{代码1}的基础上改写代码,达到下面要求:
(1)首先,提取出所有图片的“原始图片的名称”、“属于训练集还是验证集”、“预测为分组类型”;文件的路劲格式为:例如,“MTB-1\Normal\XXX.png”属于Normal,“MTB-1\COVID-19\XXX.jpg”属于COVID-19,“MTB-1\Pneumonia\XXX.jpeg”属于Pneumonia,“MTB-1\Tuberculosis\XXX.png”属于Tuberculosis;
(2)其次,根据样本预测结果,把样本分为以下若干组:(a)预测正确的图片,全部判定为A组;(b)本来就是COVID-19的图片,预测为Normal,判定为B组;(c)本来就是COVID-19的图片,预测为Pneumonia,判定为C组;(d)本来就是COVID-19的图片,预测为Tuberculosis,判定为D组;(e)本来就是Normal的图片,预测为COVID-19,判定为E组;(f)本来就是Normal的图片,预测为Pneumonia,判定为F组;(g)本来就是Normal的图片,预测为Tuberculosis,判定为G组;(h)本来就是Pneumonia的图片,预测为COVID-19,判定为H组;(i)本来就是Pneumonia的图片,预测为Normal,判定为I组;(j)本来就是Pneumonia的图片,预测为Tuberculosis,判定为J组;(k)本来就是Tuberculosis的图片,预测为COVID-19,判定为H组;(l)本来就是Tuberculosis的图片,预测为Normal,判定为I组;(m)本来就是Tuberculosis的图片,预测为Pneumonia,判定为J组;
(3)居于以上计算的结果,生成一个名为result-m.csv表格文件。列名分别为:“原始图片的名称”、“属于训练集还是验证集”、“预测为分组类型”、“判定的组别”。其中,“原始图片的名称”为所有图片的图片名称;“属于训练集还是验证集”为这个图片属于训练集还是验证集;“预测为分组类型”为模型预测该样本是哪一个分组;“判定的组别”为根据步骤(2)判定的组别,从A到J一共十组选择一个。
(4)需要把所有的图片都进行上面操作,注意是所有图片,而不只是一个批次的图片。
代码1为:{XXX}
③还需要根据报错做一些调整即可,自行调整。
最后,看看结果:
四、数据
链接:https://pan.baidu.com/s/1rqu15KAUxjNBaWYfEmPwgQ?pwd=xfyn
提取码:xfyn